This next batch of cupcakes were the best ones I ever presented at an event.
Every.
Single.
One.
Was.
Eaten.
Needless to say, I was very excited about this and have concluded the newfound popularity to one thing: The color of the cupcakes. They were bright green (watermelon), thus appealing to kids and adults alike.
To create the green, I used WHITE cake mix and added Wilton Leaf Green dye until I reached the desired color. The mix should be a bit darker then what you want, as the dye bakes lighter.
I used Wilton tip #2D to pipe the pink buttercream and added mini chocolate chips (also marketed as "baking chocolate chips") for the seeds.
I presented these at a 4th of July party and they were a big hit, as previously mentioned.
Monday, October 8, 2018
Hot Chocolate Cupcakes
The 2017 holiday season came abnormally quick. So quick, in fact, that I did not have time for making a Thanksgiving cake. Therefore, I decided to create some stunning Christmas cupcakes. I found an idea on Pintrest: Hot Chocolate and Whipped Cream cupcakes. They seemed easy enough to make and were quite creative too.
I piped white buttercream frosting using Wilton tip #2D. On the day of my Christmas event, I used Hershey's Chocolate Sauce to create the chocolate drizzle. I also cut up mini candy canes to serve as straws.
Toppings Used:
Buttercream Frosting
Mini Candy Canes
Hershey's Chocolate Sauce
An M&M Birthday
My sister's birthday came fast in June 2017, and I decided to try something new: filling. I was excited yet nervous to try something new, but I went for it.
After the cupcakes had cooled, I cut out the middle of the cupcake, keeping a top piece to cover it later. I then filled it with mini M&Ms. Next, I put the top piece I had saved on top of it, closing the top of the cupcakes.
I then continued to frost it normally. I colored my frosting using Wilton Teal coloring, and piped it using Wilton tip #4B. I also decorated the top used Wilton white sugar pearls.
Toppings Used:
Mini M&Ms
Wilton Sugar Pearls, white
Buttercream Frosting
After the cupcakes had cooled, I cut out the middle of the cupcake, keeping a top piece to cover it later. I then filled it with mini M&Ms. Next, I put the top piece I had saved on top of it, closing the top of the cupcakes.
I then continued to frost it normally. I colored my frosting using Wilton Teal coloring, and piped it using Wilton tip #4B. I also decorated the top used Wilton white sugar pearls.
Toppings Used:
Mini M&Ms
Wilton Sugar Pearls, white
Buttercream Frosting
Bunny Butts Cupcakes
I got this next idea for my cupcakes off of Pinterest. They were quite the rage during the spring of 2017, so I decided to attempt them. I was surprised; they didn't turn out that bad! This post will be my first tutorial, and will show how I created these adorable cupcakes.
1. With white Wilton fondant, I filled the smaller section of a plastic Easter egg, which I am using as a mold to create the body of the bunny. I popped them out of the egg by sliding the Wilton knife decorating tool between the plastic and fondant.
2. For the feet, I used Wilton Tip # 12 for the actual feet (white fondant) and Wilton Tip # 4 for the toes (pink fondant). I used the tips like cookie-cutters, pressing them into the fondant to create the desired shape. I then placed and gently pressed the toe pieces onto the foot pieces to create the wanted pattern.
3. I put these pieces of the bunnies into Wilton Storing Containers, and kept them at room temperature until the day I frosted the cupcakes (I made the tails last).
4. To frost the cupcakes, I used Wilton Tip #233, and colored the frosting using the Wilton Leaf Green frosting coloring.
5. I placed the bunny bodies directly in the center on the cupcake, letting it adhere to the frosting.
6. To stick on the feet, I used a simple, clean paint brush to brush lukewarm water on the feet then stuck them onto the body of the bunny.
7. To create the tails, I rolled small pieces of white fondant into balls, dipped in lukewarm water, then rolled in Wilton white sanding sugar. Next, I gently placed and pressed the tails onto the bunny to finish the body of the bunny.
Toppings Used:
Plastic Easter Egg
Wilton Fondant, white and pink
Wilton Storing Containers
Clean paintbrush
Lukewarm water
Wilton Sanding Sugar, white
1. With white Wilton fondant, I filled the smaller section of a plastic Easter egg, which I am using as a mold to create the body of the bunny. I popped them out of the egg by sliding the Wilton knife decorating tool between the plastic and fondant.
2. For the feet, I used Wilton Tip # 12 for the actual feet (white fondant) and Wilton Tip # 4 for the toes (pink fondant). I used the tips like cookie-cutters, pressing them into the fondant to create the desired shape. I then placed and gently pressed the toe pieces onto the foot pieces to create the wanted pattern.
3. I put these pieces of the bunnies into Wilton Storing Containers, and kept them at room temperature until the day I frosted the cupcakes (I made the tails last).
4. To frost the cupcakes, I used Wilton Tip #233, and colored the frosting using the Wilton Leaf Green frosting coloring.
5. I placed the bunny bodies directly in the center on the cupcake, letting it adhere to the frosting.
6. To stick on the feet, I used a simple, clean paint brush to brush lukewarm water on the feet then stuck them onto the body of the bunny.
7. To create the tails, I rolled small pieces of white fondant into balls, dipped in lukewarm water, then rolled in Wilton white sanding sugar. Next, I gently placed and pressed the tails onto the bunny to finish the body of the bunny.
Toppings Used:
Plastic Easter Egg
Wilton Fondant, white and pink
Wilton Storing Containers
Clean paintbrush
Lukewarm water
Wilton Sanding Sugar, white
Valentine's Day Treat
This batch of cupcakes are my second that were sold at an event, this one a Valentine's Day bakesale. These sweet treats were an easy bake and I used my Wilton Color Swirl Kit (2 parts red, 1 part white) and Wilton tip # 2D. I used Valentine's Day conversation hearts for the top.
Toppings Used:
Buttercream Frosting
Valentine's Day conversation hearts
Wilton Color Swirl Kit
Saturday, September 29, 2018
Birthday Cupcakes
Despite my birthday being in July, I decided to celebrate it at my school in January. Needless to say, I made cupcakes. I got a lot of baking equipment for Christmas, which I put to the test. For these cupcakes, I used the Wilton Color Swirl Kit, a tri-color frosting tip. I used the Wilton dyes Teal Blue, Purple, and a regular white.
For the piping, I used Wilton tip 2D (this might be one of my favorite tips). This tip is compatible with the Swirl Kit, and it worked very well. I also decorated the cupcakes with Wilton White Sugar Pearls.
This is the first set of cupcakes that I was actually pleased with the outcome.
Toppings Used:
Buttercream Frosting
Wilton Edible Pearls, White
Wilton Color Swirl Kit
Saturday, September 15, 2018
Up on the Housetop
Christmas 2016 was a lot better then the previous one. I decided to do simple cupcake designs which turned out better than I thought. I simply used white buttercream, piped it with Wilton tip 2D, and then sprinkled red and green colored sugar on top.
Toppings Used:
Buttercream Frosting
Assorted Colored Sugar
Saturday, September 8, 2018
Gobble 'till you Wobble
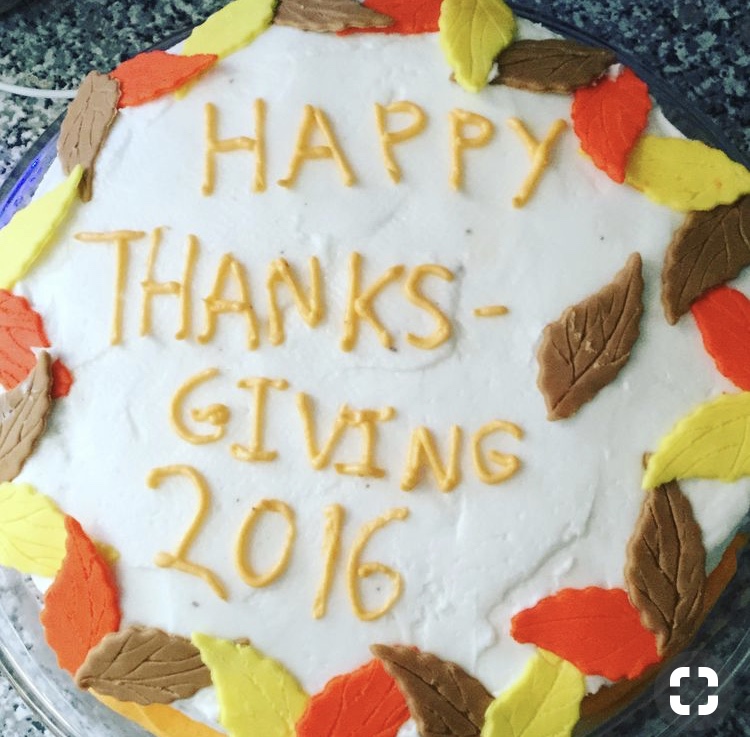
Thanksgiving 2016 could not be complete without one of my baking experiments. Every Thanksgiving I have family come over to my house. This year, my grandparents came down from New Hampshire to celebrate with us. The dessert this year was a Thanksgiving cake of my own creation.
To create this cake, I first made the leaves a few days beforehand. I used the "Skin tones" and "Neon Colors" Wilton fondant packages to create the colors of the leaves. I made the leaf shapes using leaf cutouts, then created the veins using a toothpick. I preserved the leaves in Tupperware containers and left them in a room temperature area of my house.
For the buttercream base, I heaped white frosting on the tops of the cake and then spread it to the edges using a butter knife (sorry to the professional bakers reading this). I repeated this process on the sides of the cake until it was fully covered.
I carefully placed the leaves around the edge of the cake, which hid many of my mistakes. I used a Wilton writing tip (tip # 4) to pipe the words.
Toppings Used:
Wilton Leaves Cut outs
Wilton Fondant, Skin Tones and Neon Colors
Buttercream Frosting
Saturday, September 1, 2018
Arabian Nights...
These next set of cupcakes were my first cupcakes made for a professional event. My school was performing Aladdin and his Magic Lamp and they needed items for the concessions. I decided to bake something even though I was performing in the play (Aladdin's sister) and needed to focus on memorizing my lines.
To create these cupcakes, I first made the lamp decorations. I used regular, white-colored fondant and fashioned them into lamp shapes. I then used the Wilton Edible Gold Spray Paint to tint them gold. For the frosting, I colored the frosting a lavender purple, probably using a store brand frosting dye. I then frosted the cupcakes using a round tip (tip # unknown). Finally, for the purple glitter, I used Wilton Purple Sanding Sugar.
Toppings Used:
Buttercream Frosting
Wilton Fondant, White
Wilton Purple Sanding Sugar
Wilton Edible Gold Spray Paint
Sunday, August 12, 2018
Easter Cupcakes & "It's A Boy!" Cupcakes
For Easter of 2016, my cupcakes were simple, with no fondant. I had many cupcakes to frost, and, as my second cousin was having a baby, I also decided to present them with a few specifically made ones. For these cupcakes, I used the Wilton 2D frosting tip to create a white, star-shaped background.
Then, using a small Wilton writing tip (tip # unknown), I used brown-colored buttercream to pipe a few thin, circular lines around 3-4 Hershey's candy eggs.
For the specialized "It's a Boy!" cupcakes, I used the same frosting techniques, but only put blue candy eggs in the nests. I did some star method piping with blue buttercream as well.
Toppings Used:
Buttercream Frosting
Hershey's Candy Eggs
Sunday, August 5, 2018
Have a Holly, Jolly, Fondant Christmas
My second fondant masterpiece, needless to say, did not hit the target either. However, I did lay off the fondant and try my hand at decorating with frosting, which I am much better at. For this Christmas delight, I arranged twelve cupcakes in a circle and frosted them using a Wilton 1m type tip (because of inexperience, it is uncertain what tip I used) with the star method. I also made a bow and holly berries out of fondant.
Toppings Used:
Wilton Fondant, Assorted Colors
Buttercream Frosting
Tuesday, July 31, 2018
The First Concoction
It all started in the fall of 2015, my sixth grade year at St. John Paul II School. My Literature teacher issued a middle-school wide book report, but instead of an actual summary of the book, students had to create a scene or symbol from the book they read...that had to be entirely edible! It was called the "Edible Book Fair".This was the first time I had EVER done anything that involved baking or cooking of any sorts. Up to this point I was certain I would have no luck in the culinary department, but that changed quickly, however.
As soon as this project was assigned, my mom instantly enlisted the help of our neighbor, to help with decorating our cakes. She was well known throughout the neighborhood for her beautiful cakes and fabulous fondant work, and my mom thought it a good idea for her to give us a crash course in Cake Decorating 101. She lent us some of her tools, and, before I knew it, I was head over heels in love with fondant and frosting, and simply cake-decorating in general.
I have to admit, my first fondant creation was not the best. In fact, it was FAR from it! This two-cake tall concoction was layered in frosting, fondant, and more frosting... in that order. Not to mention the amount of sugar pearls and pink Nerds encrusting the cake as well. Poor preserving methods ensured that anything we kept in Tupperware containers overnight became soggy as well (fondant and cupcakes).
Nevertheless, I was so fascinated by this type of baking and decorating that I decided to stick with it and see what I could learn in the years to come, and hopefully become a better baker.
Toppings Used:
Wilton Fondant, Assorted Colors
Wilton Sugar Pearls
Nerds Candy
Buttercream Frosting
Subscribe to:
Posts (Atom)
Watermelon Cupcakes
This next batch of cupcakes were the best ones I ever presented at an event. Every. Single. One. Was. Eaten. Needless to say, I was v...
-
Christmas 2016 was a lot better then the previous one. I decided to do simple cupcake designs which turned out better than I thought. I sim...
-
My sister's birthday came fast in June 2017, and I decided to try something new: filling. I was excited yet nervous to try something new...
-
This next batch of cupcakes were the best ones I ever presented at an event. Every. Single. One. Was. Eaten. Needless to say, I was v...